We had an hour and twenty minute drive from the cabin to the parking area of Clingman’s dome. In my infinite wisdom I decided to take a little “short-cut” through the Smokey Mountain National Park and entered through Townsend, Ten. We then took the VERY WINDY little river road to Hwy 441 and up the mountain. OK, so I was in a hurry to get there and didn’t want to miss any of the show so I may have been driving a little faster than normal causing poor Isabella to get sick in the back seat. After a little cleaning and slightly slower pace, we made it through little river road..jpg)
With every opening lookout along the way my anticipation built as the clouds were illuminated with a pastel pink and orange glow. We arrived to a full blown light show with a couple of minutes to spare (literally).
We were not alone, there were already 30-40 photographers lining the edge of the parking lot firing away. I proceeded to jump out of the car and set-up the tripod, camera and 70-200mm zoom in record time! Ivonne and Isabella (4 years old) bundled up and sat on the back of the truck drinking hot chocolate and enjoying the view while Tommy (3 years old) slept in the warmth of the car..jpg)
Thanks Ivonne, Isabella and Tommy for a Sunrise to Remember
Tom Even
Wednesday, November 08, 2006
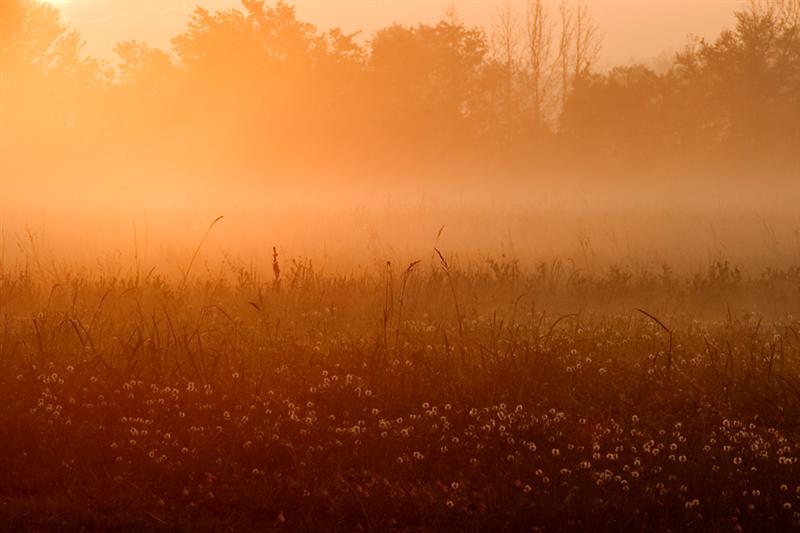
A Sunrise to Remember
Wednesday, November 01, 2006
"Big Easel" Art Walk - November
.jpg) I will be participating in a local art walk in the River Ranch area in Lafayette called "The Big Easel" in November. It is a very nice event featuring artists from the area along with food and music. This will be my third Big Easel event in the past couple of years.
I will be participating in a local art walk in the River Ranch area in Lafayette called "The Big Easel" in November. It is a very nice event featuring artists from the area along with food and music. This will be my third Big Easel event in the past couple of years.I am working on getting some of my latest images from the Smokey Mountains trip ready and matted for the show.
It will be on Saturday November 18th from 8-5 in the town square area in the River Ranch development.
Regards,
Thomas Even
Tuesday, October 31, 2006
Get soft "cotton candy" stream photos
 I have always loved those images of mountain streams where the water is flowing over rocks and has a cotton candy effect, but living in southern Louisiana I don't see many of these photographic opportunities. So needless to say getting a few stream shots was high on my list of photographic subject while in The Great Smokey Mountains National Park.
After getting settled in our cabin and getting the sunrise from the top of Clingman's Dome out of my system, I set out for an afternoon of stream photography. I picked an overcast afternoon that quickly turned into a rainy overcast afternoon. As soon as I left the Cabin it started to rain and didn't stop until I returned. I considered waiting, but had already left the family napping in the cabin and didn't want to miss the opportunity to concentrate on photography for an afternoon.
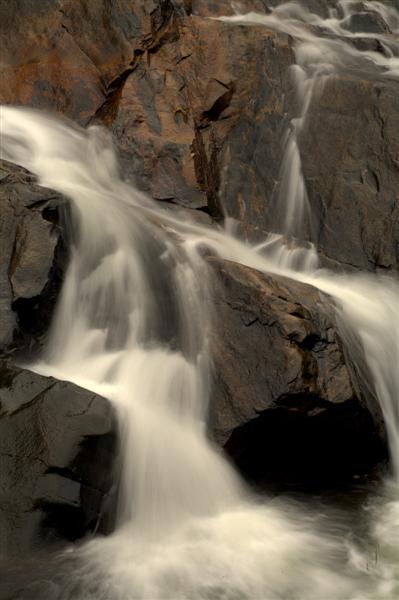
There are a couple of techniques that will help when out photographing moving water that allow an enormous amount of creativity and experimentation. First of all pick a day with overcast sky or early/late lighting. This lower light level will allow you to use slower shutter speeds (up to several seconds). The softer light also provides less contrast and allows the camera's sensor (or Film) to record the full dynamic range of the scene. When I set-up at a location I like to start with a wide angle lens and look for foreground elements to lead the viewer's eye into the scene. I will usually follow with a medium telephoto lens (17-200 mm is a great choice) to isolate elements of the scene and selectively compose smaller cascades. You will want to close down the aperture of the lens to a smaller setting (say f-22 or smaller) allowing for a slower shutter speed to expose properly. In the images I have posted the shutter speed was between 2-4 secs. With shutter speeds this slow you MUST have the camera on a tripod or resting on a stable object of some kind, there is no way you can hand-hold a camera still for more than a fraction of a second.
The rule of thumb is to use a tripod if the shutter speed is slower than the reciprocal of the focal length. as an example if you are shooting at 100 mm then you can hand-hold up to 1/125 sec shutter speed. Of course the newer Image Stabilizing systems allow hand-holding to a couple of stops slower, but this still only gets you to 1/30 sec.
The other advantage of using a tripod is that it slows you down, giving you time to refine the composition, level the camera, bracket exposures, etc, etc.....
I find that using a Polarizing filter not only reduces the light entering the lens (allowing for even slower shutter speeds), but it removes the glare from rocks and leaves creating more saturation and color depth. Another filter that can help if the light levels are too high for slower shutter speeds is a Neutral density filter, this is a neutral gray filter that does not change the color of the image, but lowers the light level entering the lens.
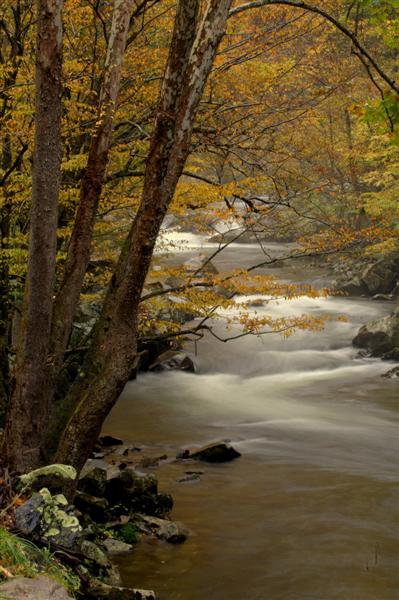
Finally, I shot several compositions and found that looking upstream produces the most pleasing images.
Go out and take some pictures,
Thomas Even
Please post a comment and let me know what you think.
Wednesday, October 25, 2006
The Great Smokey Mountain National Park
.jpg) We took our family vacation a little later than normal this year and decided to head up to the Smokey Mountains for a little RR and leaf peeping. I will be putting several blog posts up relating to the trip and photographic possibilities I discovered while hear in the Smokey's for a couple of weeks.
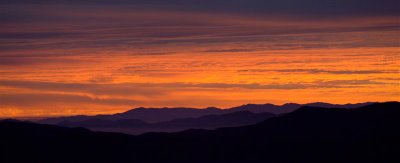
We took our family vacation a little later than normal this year and decided to head up to the Smokey Mountains for a little RR and leaf peeping. I will be putting several blog posts up relating to the trip and photographic possibilities I discovered while hear in the Smokey's for a couple of weeks.This image was taken from the parking lot at Clingman's Dome shortly after sunrise. As you can see the trees were in peak color. This image struck me as two photos, it looks like the bottom mountain range could be one photo and the upper blue range another. It is however one image. Well, I have to get back to the family and continue the vacation.
Regards,
Thomas Even
www.tomeven.pbase.com
Monday, October 09, 2006
Shooting Star Essay Puplished on Beautiful-Landscape.com
 On August 19th of this year I posted a photograph of a Shooting Star over Lafayette, LA. Well, Alain Briot has published my essay describing the image and thoughts on "luck" on his web site, www.Beauliful-Landscape.com.
Alain is one of the most successful landscape photographers in the US, I was fortunate to be able to attend his Navajo Lands Workshop Last October.
Please check out the essay here on Alan's Site.
Thomas Even
www.pbase.com/tomeven
Saturday, October 07, 2006
The Dynamic Landscape - Jekyll Island
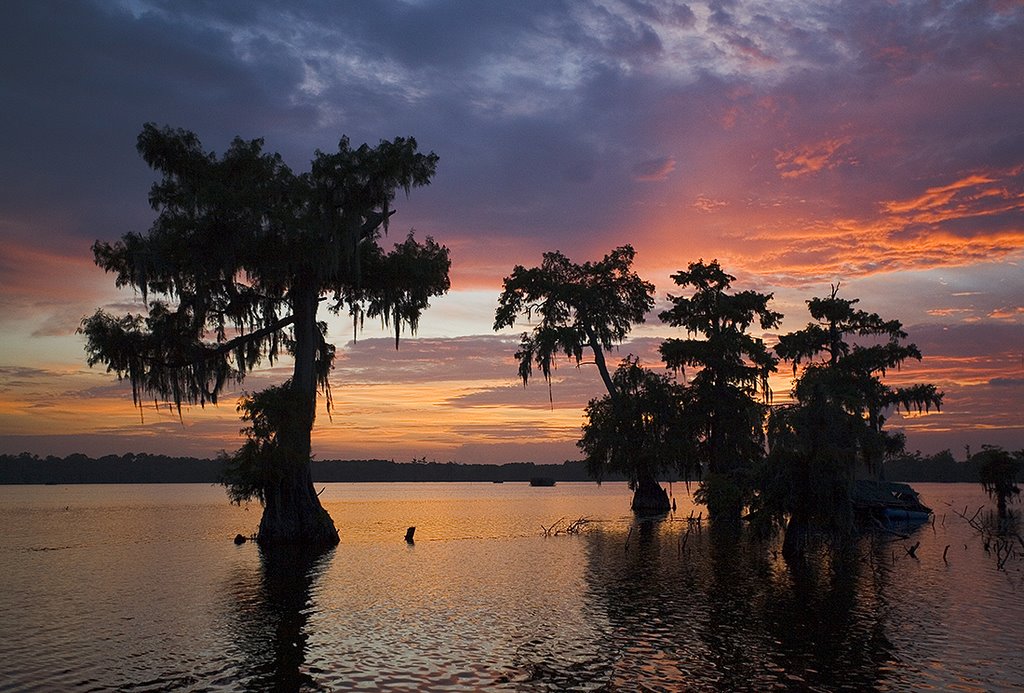
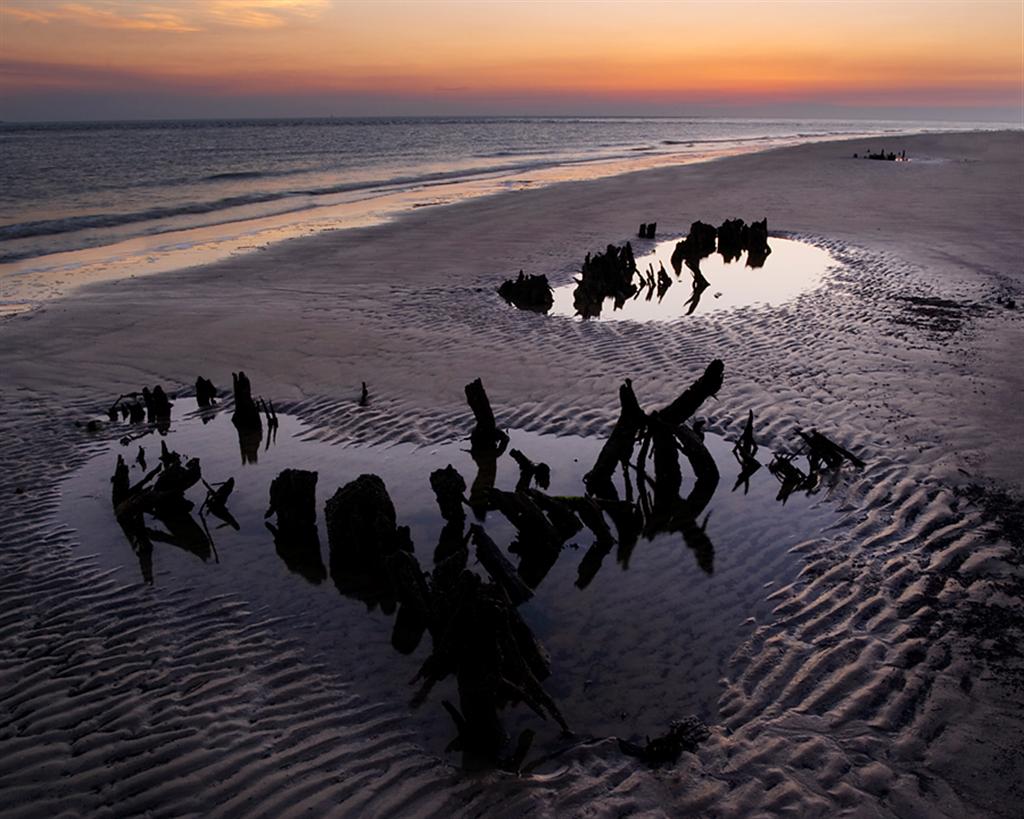
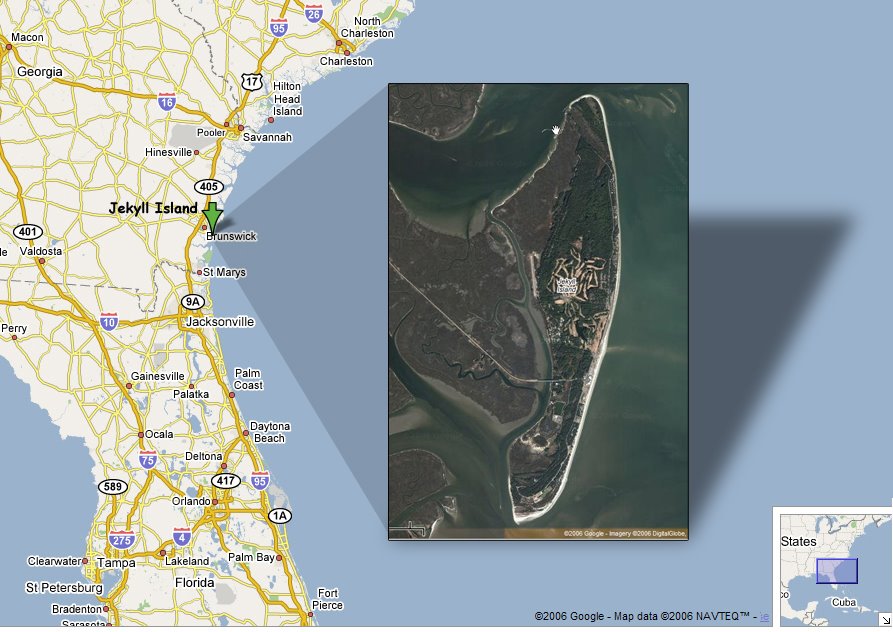 Jekyll Island is located on the southern side of Georgia's coast. I spent a couple of days on the Island in March on a family vacation to Florida. The Island offers unique photographic opportunities due to the graveyard of oak trees on the beaches. Over time these trees have died and become "driftwood" stranded in the sands. The beach on the northeast side of the island is aptly named "Driftwood Beach". The location offers interesting and dynamic compositions with the organic shapes and silhouettes offered by these foreground elements.
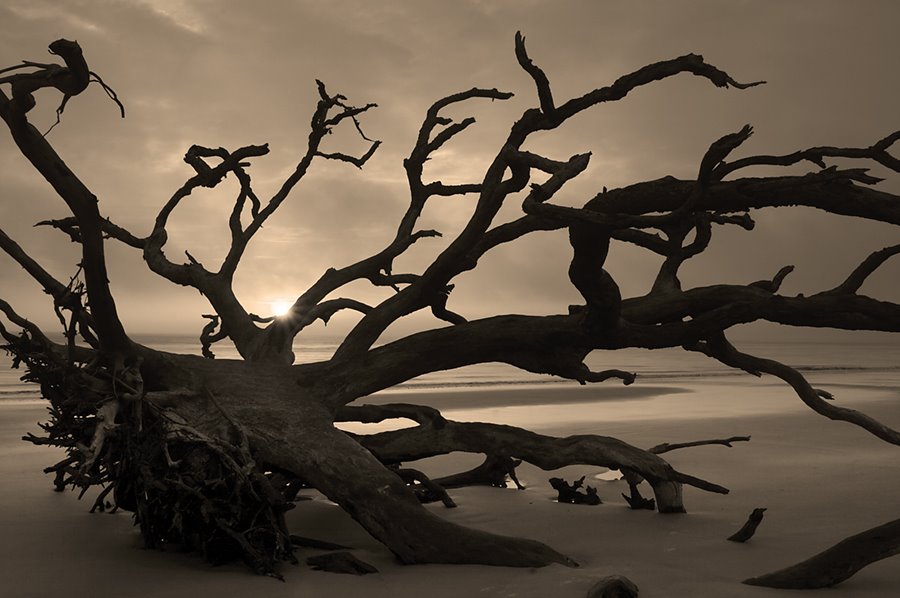 For sunrise images the eastern coast offers compositions with the rising sun silhouetting the driftwood against the sea and sky. There are infinite compositions available with driftwood of all shapes and sizes to choose from.
In the first image I framed a large tree against the rising sun creating a very graphic image. I chose to convert the image to monochrome to eliminate the distraction of color and allow the eye to focus on form and shape.
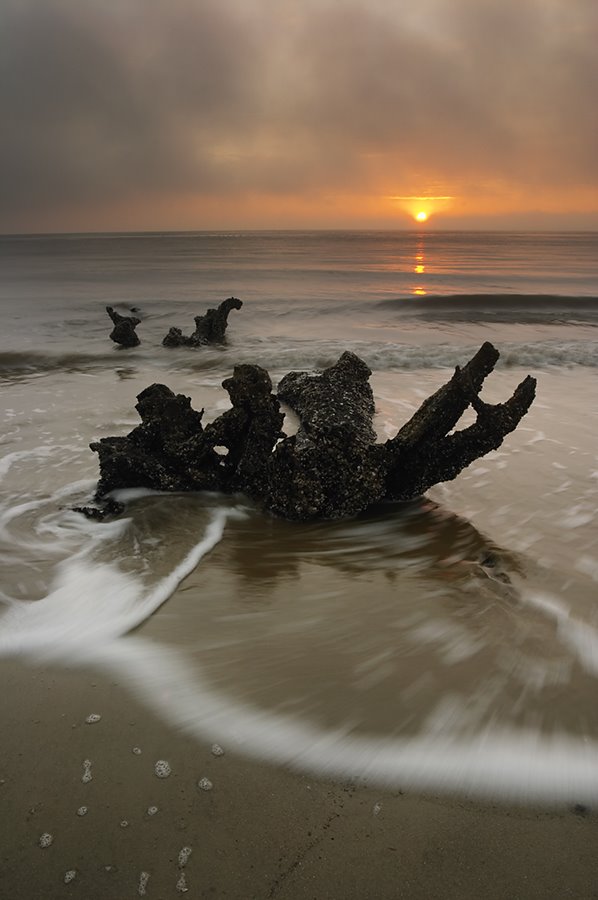
The second image was an attempt to capture the graphic random shape of a snag on the beach with the smooth silk motion of the water. I made several attempts with this concept and this one was the most successful.
Thanks to Craig Tanner of the Radiant Vista for the Critique of this image. Click on the video below to view the critique (the video aspect ratio is compressed, but you get the idea.
Thursday, October 05, 2006
The Ordinary
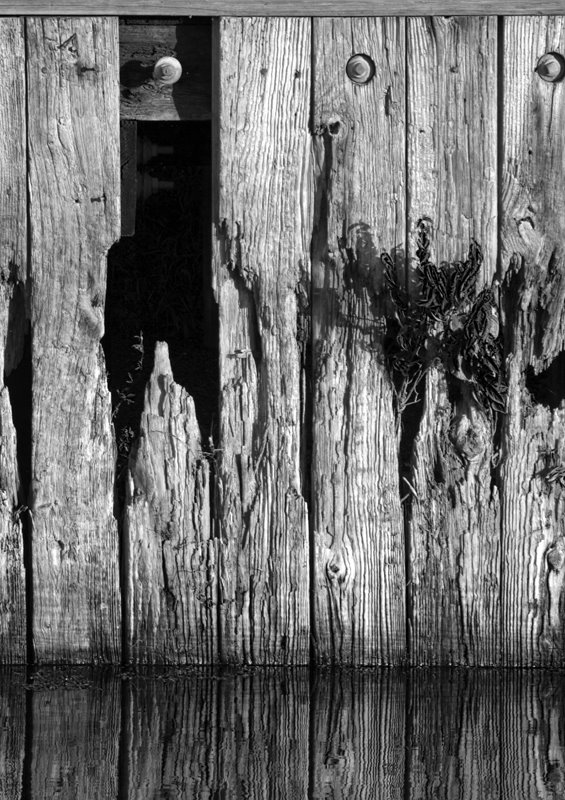
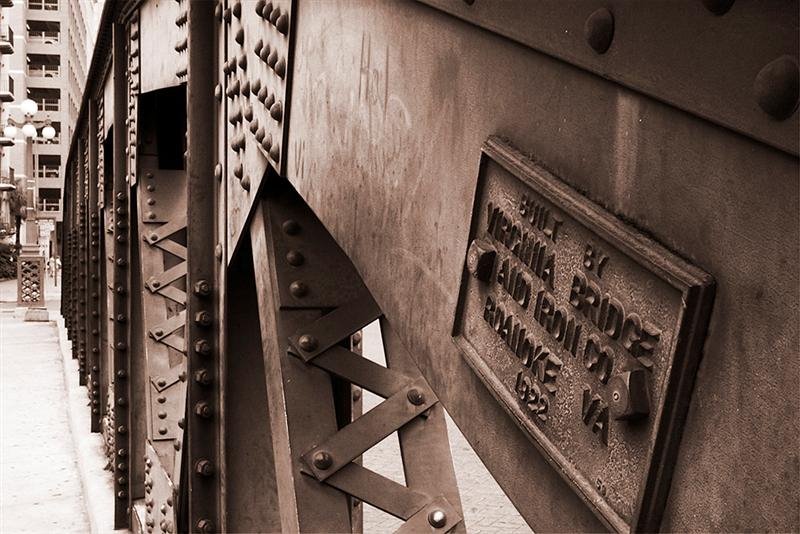
 I grabbed this shot out of the window of my car last Saturday morning. I was driving home with my camera on the front seat and pulled into a parking lot and this window shutter grabbed my attention. At the time I really couldn't say what caused me to take the shot, but I have decided that when a subject grabs my attention to go ahead and take it and think about why later.
As I was reviewing the images, this one struck me as a rather ordinary subject. There is nothing striking or exciting about the image, yet I enjoy looking at it. There is a play of light and Shadow with interesting lines and texture that seems to keep my eye moving. One of the ways I judge images is by the time I spend looking at them and whether I am drawn in. This is a subjective and personal criteria, but that is what it is about for me. There is something powerful about viewing the ordinary with different eyes. Stop every once and a while and look at the ordinary in terms of shape, texture, pattern and tone.
Until next time,
Thomas Even
www.pbase.com/tomeven
Saturday, September 30, 2006
What is Beauty?
 What is beauty? Is it defined by a majority view or aesthetic? Is it defined by the individual viewer's eye?
There is no question that there is a majority aesthetic, we see examples in popular magazines of landscapes and people that are "beautiful". Think about cultures around the world or throughout time, this majority aesthetic changes depending on cultural influences. If you have taken an art history class, you see how trends in culture and art shift and flow over time.
Television and photography has an inherent ability to shrink the world. When more and more people are influenced and told what beauty is and how it is suppose to look the majority aesthetic grows.
Anyway, I am blabbing about this because I find that people who are creative often march to a more unique tune when it come to what they like. I think the actual creative process releases our minds or spirits to think more independently and find a more internal gauge for beauty than simply the television. It is a process of growth and maturity.
Does this mean that you have to disagree with the majority opinion of beauty to be "mature"? Absolutely not! Just as foodies will find their "taste" (no pun intended), if you enjoy art or photography take the time and look inside for your own visual taste.
Develop your visual "taste".
Thomas Even
www.pbase.com/tomeven
Light and Pattern
 I finally scoped the cash together to purchase a new Canon 300 mm f/4L IS lens a couple of weeks ago. This is my first IS lens and I must say the IS (Image Stabilization) feature is impressive. For those of you who may not be familiar with image stabilization, the lens has a gyro and moving lens elements that compensate and dampen the normal camera movement while hand holding. This allows photos at slower shutter speeds.
So anyway I went to my favorite local landscape location yesterday to try out the lens at dawn. On the way home I kept the camera and lens on the passenger seat and looked for interesting compositions with the morning light. The image to the left is a bank under construction, I stopped, of course, and took several compositions isolating sections of the building focusing on the complex patterns created by the layers of vertical and horizontal lines. This particular shot has 5 construction workers (there is one in the bottom left corner looking at the others). I think the graphic complexity along with the human element is what intrigues me with the image.
Click on the image for a larger view.
Please let me know what you think in the comments.
Go and set your alarm clock.
Tom Even
www.pbase.com/tomeven
Wednesday, September 27, 2006
When the Saints Go Marching In....
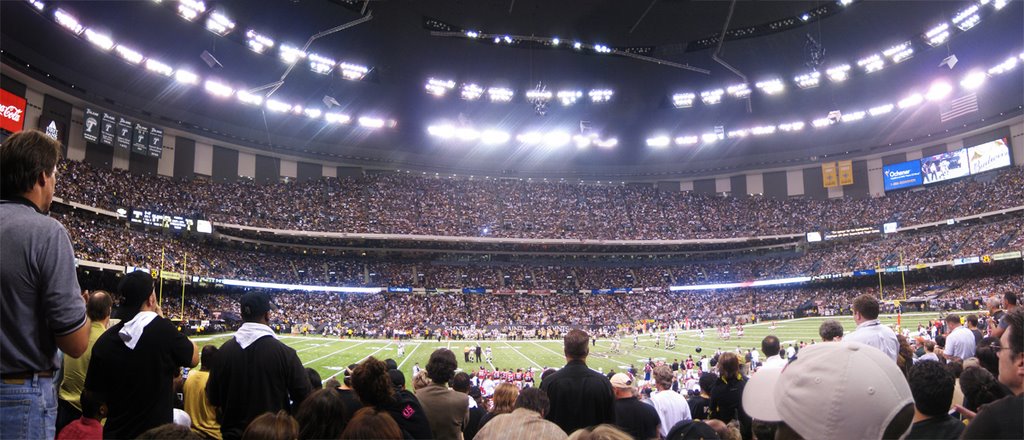 Panorama Stitch of Superdome re-opened 9-25-06
Saints 23 - Falcons 3
Monday, September 25, 2006
Rainy Day Discoveries
Time is a currency that obeys the laws of supply and demand like any other currency; it increases in value the less you have of it. We all have to balance time with our spiritual life, family, work, exercise, entertainment, hobbies, social obligations, etc, etc…. Surely I am not alone in feeling the limitations of time in daily life. So back to the subject of all those digital images (hundreds and hundreds of them), I have a tendency to process the images that catch my eye on the first pass through of grading the files and move on to the next shoot. Usually this catches the best shots, but as time passes our “eyes” have a tendency to evolve, our aesthetic senses have a tendency to change as we walk through life.
 After several months I decided to review the RAW images from the Navajo lands workshop I attended in October of 2005. On this pass through the files I found several images that did not make the original cut for whatever reason. After processing these images I found that they were among my favorite images from the trip. I am not sure if this is because they are fresh to my eyes or if they are actually stronger images, only time will tell. So the next time you are sitting inside on a rainy day take a look through some of those old images with a new set of “eyes”, there may be a diamond in the rough.
Thomas Even
www.pbase.com/tomeven
Wednesday, September 20, 2006
"Tinker Tubes" - Instant Portrait Lighting
 After watching Dean Collins portrait lighting DVDs I ran out to the Garage last Sunday afternoon and built a set of light panels out of 3/4" PVC and ripstop nylon. These are not small, measuring in at 52" X 82", but they beak-down easily for transportation. I was able to build two (2) panels for about $20 in PVC and $30 in fabric. You can get the plans for these "tinker tubes" here, thanks to the Strobist for the link.
I decided to take them out on location for a shoot in afternoon sunlight as a diffusion and reflective light source. The first picture posted is a set-up with the translucent panel to camera right and reflective panel to camera left. Sunlight is the only light source and is from camera right. As you can see from the image this set-up creates soft wrap-around lighting, which is very flattering to the subjects. One other consequence of screening the direct sunlight is a brighter background as the exposure must be adjusted for the lower light levels on the subjects.
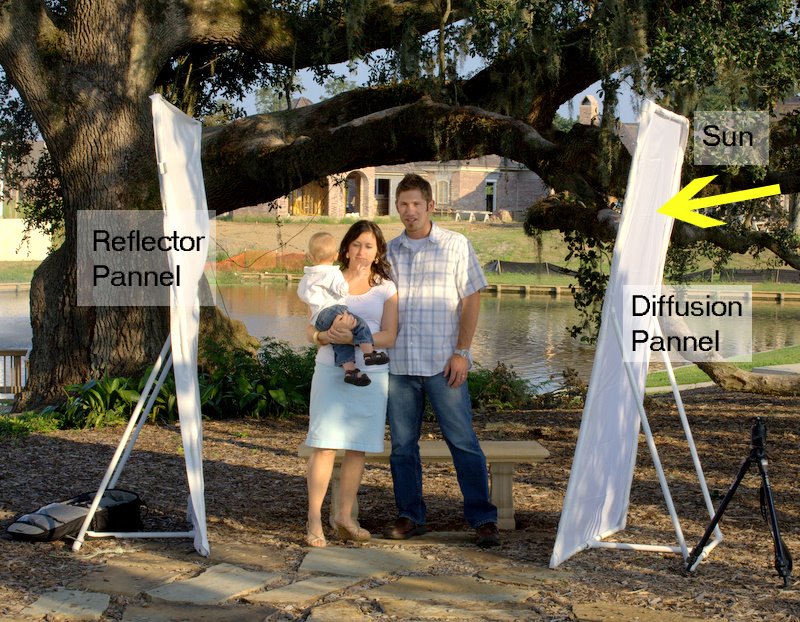 As you can see from the picture I ended up placing my camera bag on the reflector panel for stability. (it's not nice to drop lighting gear on you customers while shooting...)
Go out and have some Fun!
Tom Even
www.pbase.com/tomeven
Tuesday, September 05, 2006
Open Shade and Natural Reflectors
 We have all heard the advice "shoot during the magic hours at sunrise and sunset for the best lighting and avoid the mid-day sun". Well, for most of the photography I end up engaged in, morning and evening is the time I shoot. However there are opportunities to tame the harsh light of the mid-day sun and one of those is Open Shade.
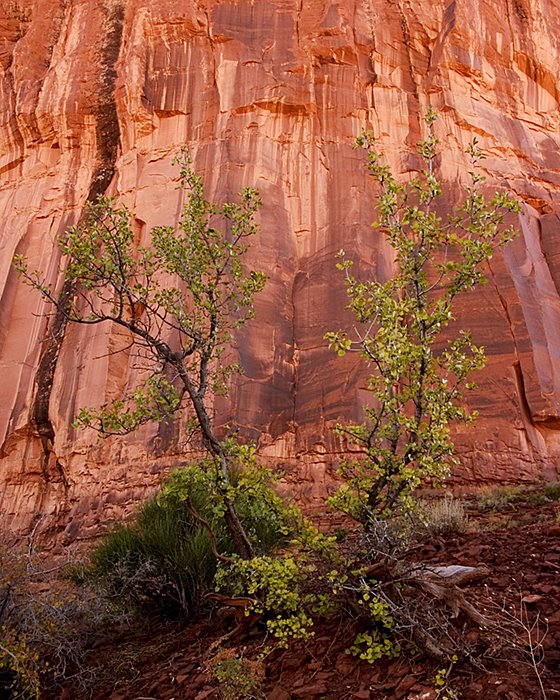
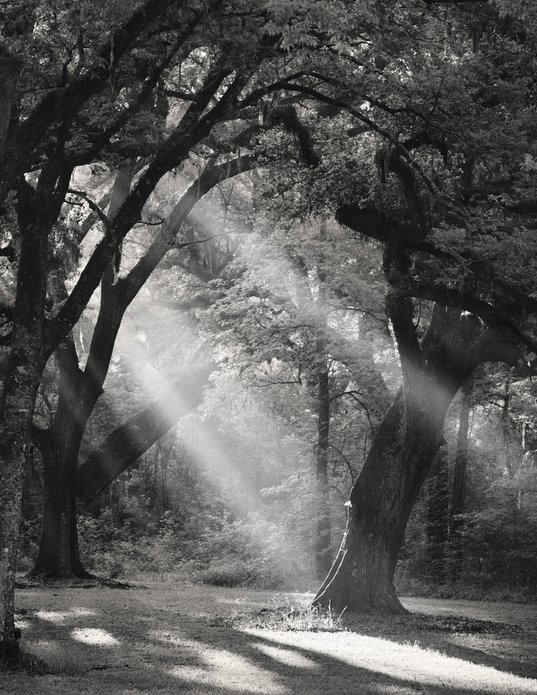
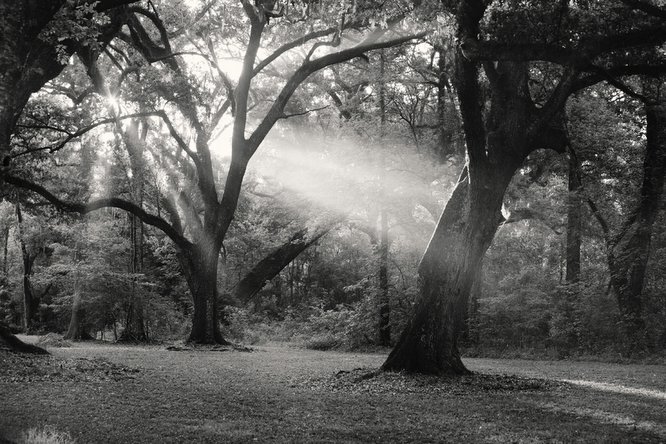
Open shade is simply an area out-doors that is shaded from the direct light of the sun, therefore being illuminated by reflected light. On a workshop I attended last October in Arizona, Alan Briot scheduled one of the shoots in Monument Valley at noon. To be honest I was not expecting to get any stunning images during this shoot because of the lighting. Before we started Alan explained that we would be shooting in open shade and this lighting is one of the "best kept secrets in photography".
As you can see from the image of the tree in front of a cliff, the colors are saturated and the lighting has a wonderful soft warm quality.
Well, fast forward to this past labor day weekend: we were enjoying our family's company at a birthday party for my nephew. It was time for the games and I had my camera to capture some of the action in the backyard. After taking a few pictures I noticed a soft glow on the kids faces, I looked around and sure enough we were in open shade with a natural reflector. It was 5:00pm on a clear day, but everyone was shaded by the house and a large building to the east of the yard was reflecting a warm glow.
 This diagram shows a conceptual representation of the lighting Sunday afternoon. This is the type of lighting that is reproduced in many studio portrait sessions. Here the main light is not the sun, but a reflection of the sunlight causing the light source relative to the subject to increase...creating softer (more diffused) light.
As photographers we need to learn to "See" the light, and realize what makes attractive lighting. Once we understand the concepts, it allows us to adapt to the environment when scouting a shoot or just taking pictures at the nephew's birthday party.
The image below was taken at the Party with reflected sunlight in Open Shade

Go look for the light!
Tom Even
eventj@gmail.com
www.thomaseven.com
www.pbase.com/tomeven
Thursday, August 31, 2006
Kids and an off-camera Flash

Most of my photography has been focusing on landscape subjects and natural light portraits to this point. The whole "off-camera flash" thing seemed complicated and expensive to get into, so I procrastinated, and focused my time and money on landscapes (which I love).
I put together a little off camera flash set-up after getting into a new flash Photography Blog called Strobist. The setup includes a Sunpak 5000 Strob, light stand, 40" umbrella and PC cord to the camera.

After setting up the flash in the living room I got the kids to pose for a couple of minutes (Tommy was in and out, it is hard to keep him still). I then put on a homemade cardboard snoot (Thanks to the Strobist again) and took the shots below with the kids looking into the flash. Nice effect!


I plan to continue to play with my new found toys and add more off-camera flash quickly (I have already purchased a Nikon SB-24 on e-bay...)
Tom Even
www.thomaseven.com
www.pbase.com/tomeven
Saturday, August 19, 2006
Shooting Star
This shot was taken well before sunrise looking west toward
UPDATE (10-9-06):
Alain Briot has published my essay describing the image and thoughts on "luck" on his web site, www.Beauliful-Landscape.com.
Alain is one of the most successful landscape photographers in the US, I was fortunate to be able to attend his Navajo Lands Workshop Last October.
Please check out the essay here on Alan's Site.
Tom Even
www.thomaseven.com
www.pbase.com/tomeven

Sunday, July 30, 2006
Photography group outing
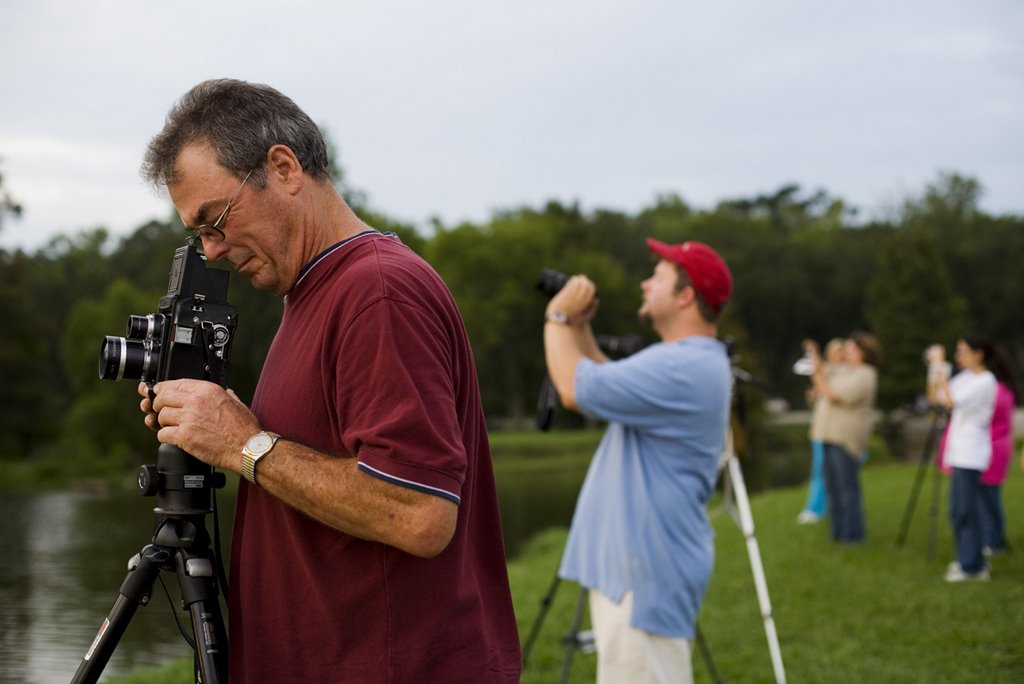
I have been leading a photography group that meets at our Church twice a month. We have been discussing aesthetics in photography and composition lately and just completed our first group location shoot. We met after work this past week and caravanned over to

Sunday, July 23, 2006
A familliar View
Over the past few years of visiting
This just serves as another reminder of how a familiar location is never quite the same.
Sunday, June 04, 2006
Thursday, April 27, 2006
Find a place you like and go back

I have found over the past couple of years that the more often I visit a place the more creative I become. When you first visit a location there are scenes and images that initially grab your attention, they are probably the same scenes that grab most visitors attention.
On a recent trip to Arizona I walked to the edge of Canyon de Chelly and my breath left my lungs. I was overwhelmed by the grand landscape and felt a rush of emotion looking into the canyon floor. I hear people explain this experience all the time when describing visits to the Grand Canyon. But they are not able to capture compelling images that convey the emotions they felt.
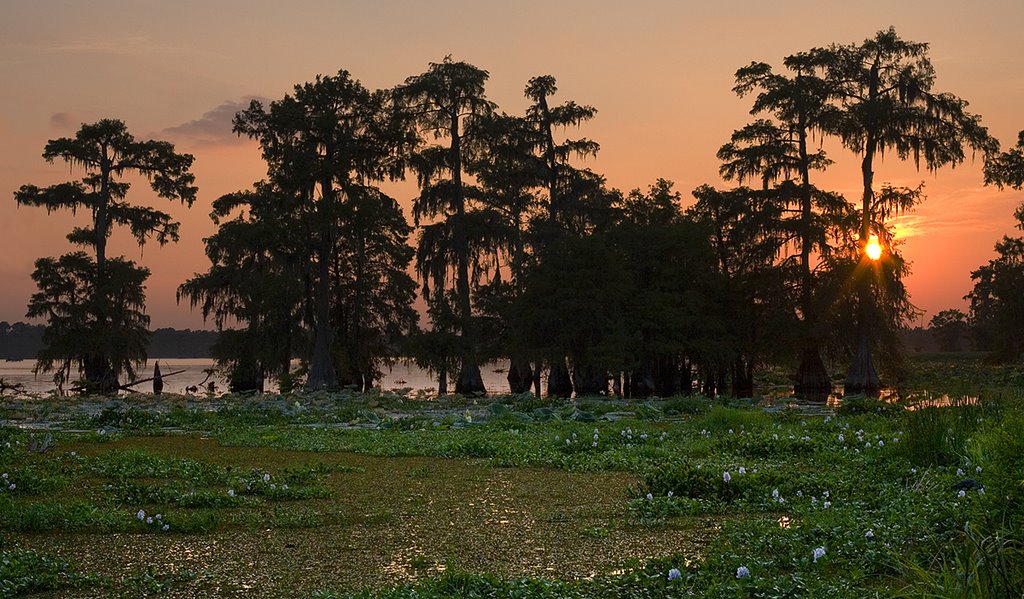
I decided to pick a location near home that I enjoyed and had many photographic opportunities and visit frequently. Over the past three years I have visited Lake martin over 50 times. Each time I return I find new compositions and stretch myself creatively to create new and compelling images. In the process I have noticed that when I visit locations for the first time that creative process has become more fluid and natural. I find my eye is able to see beyond the obvious image.
Sunday, April 09, 2006
New Perspectives
Fast forward to this past summer, I finally replaced my lens with a 17-40mm. Ivonne (my lovely wife) and I took a trip to San Antonio,Tx for some much needed R&R. I found the wide perspective allowed me to experiment with compositions and create some dynamic images. The image in this blog was taken while we walked from our hotel to the river.
Friday, March 31, 2006
The Big Easel - Art Walk
I was really overwhelmed with the responses to the images. The interaction with and observation of art lovers who were touched & impacted with the images was extremely gratifying. It reminded me that I don't just create images for myself, but that the creative process is finally completed when the viewer experiences the work.

The next show I will be participating in is coming up May 6th & 7th in downtown Baton Rouge, LA. FestForAll is a two day festival with Art, Food, Music & Performing Arts.
Saturday, March 11, 2006
Jekyll Island Georgia Trip


Friday, February 24, 2006

Wednesday, February 22, 2006
Digital Panoramas
How to capture and stitch multiple images into one high resolution image.
One of the great advantages to working digitally is the ability to stitch multiple images into a single high resolution photo for printing on a large scale. Many of today’s digital cameras are coming with the software to combine multiple images and even assistance in aligning the images during capture, but the results are mediocre at best. I have been experimenting with the use of an inexpensive software application that assists in this process, PT Assembler, with fantastic results. I routinely create 20-35 mega pixel images using 4-10 (6) mega pixel images combined with PT Assembler. This technique is not limited to panoramas; you are free to create super resolution images of any aspect ratio.
Set-up and Capture of the Images
Camera Support:
The set-up and capture of multiple images to be later stitched together is similar to standard image capture with a few controls that should be followed. First of all the camera should be securely mounted on a sturdy, level tripod if at all possible. The tripod will assist with composition and help ensure the horizon is level in the image, not to mention give your images the maximum sharpness possible. This is critical when shooting at sunrise or sunset where the exposure time will be extended, especially if the lens is stopped down (small aperture: f22, etc.) to maximize depth of field. Your tripod head should have a panning feature at a minimum, allowing the camera to be panned while the other directions of movement are fixed. I started taking images for stitching using the Manfrotto 490RC4 Ball head, but this does not give precise control of the axis of rotation or pitch movements.
If you are serious about panoramic photography then the best tool is a panoramic tripod head, which eliminates parallax error when used properly. Parallax occurs when the objects in the foreground appear to move relative to the background due to a perspective change. If you stand in front of a tree and move to the side the tree will appear shifted relative to the background. This occurs when the camera is rotated around an axis other than the lenses optical center. Every lens has at least one optical center or Nodal Point, most zoom lenses have an optical center for each focal length. The panorama tripod head allows the lens optical center to be fixed on the axis of revolution. I have been using the Panosourus Tripod Head, for the price ($55) this is the best option I have found. The head is made of wood and not for a heavy camera & Lens combination (over 3 lb).
It is also important to overlap the images by 10%-20% to aide in the alignment and blending between images. Much more that 20% and you are just wasting pixels. While we are discussing prep for the stitching, it is a good idea to note where eye level is in the seen (look at eye level at your composition and pick out a centered point). You will need this reference while assembling the images.

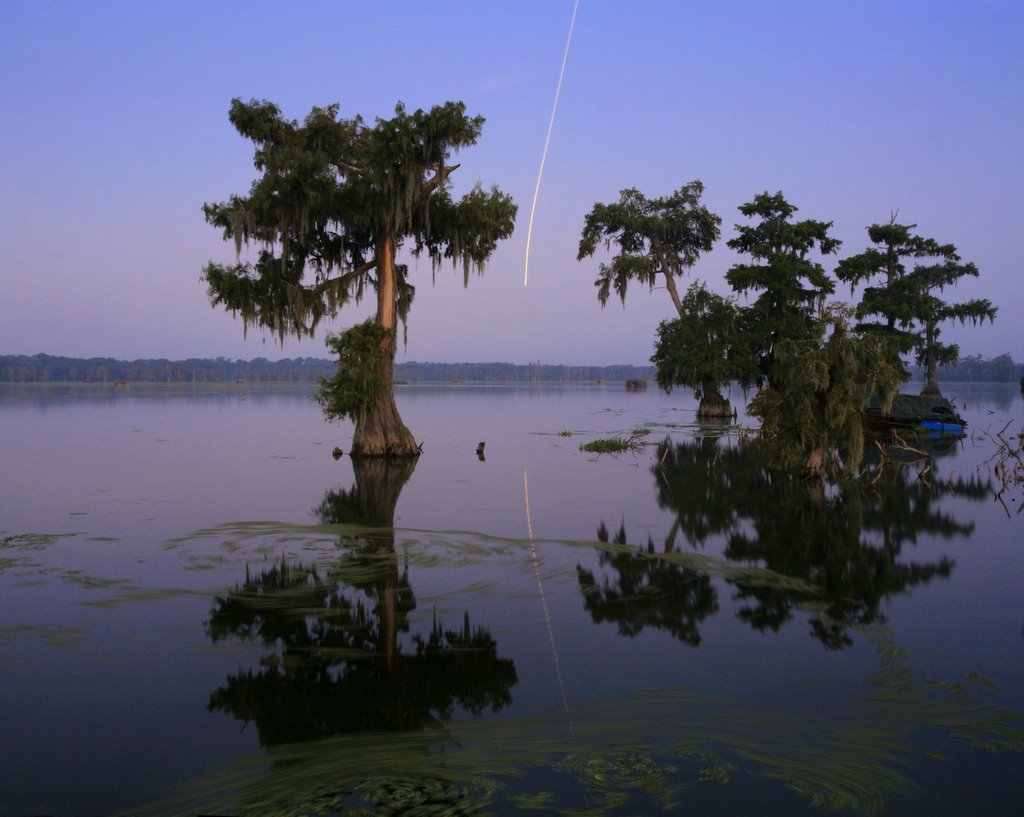
Canon 10D 70-200mm F4 @ 70mm
Combination of (6) portrait images using PT Assembler
Lake Martin Louisiana "Cypress Panorama #1"

100% (Actual Pixels) crop of tree on the left
The composite below shows the (6) images prior to Stitching. As you can see the software corrected the image for barrel distortion, especially evident on the two (2) images on the left.

Canon 10D 70-200mm F4 @ 70mm
Individual (6) portrait images prior to stitching
Exposure Settings: First of all set your camera exposure to Manual, this will keep the exposure settings consistent through the different captures. If the exposure settings change between images the seams will reveal different depth of field or under/over exposure between images. Similarly, I like to set the focus with the entire image in mind and flip the lens to manual focusing. I have forgotten this step a couple of times and as you can imagine the auto focus changed between images. I generally prefer to stop down the aperture (f/16 - f/22) creating greater depth of field.
Stitching the images in PT Assembler
There are several panorama stitching programs including Photoshop CS with improved stitching capabilities, however I have stuck to PT Assembler, which is a Windows helper program for Panorama Tools, Helmut Dersch's panoramic image stitching software. This is not a complete tutorial for PT Assempler and Panorama Tools, just an overview of the process.
I typically take the images in RAW format, apply a few exposure corrections to one of the images, then apply those changes to the rest of the images using the RAW processing software and convert to TIFF's. Once loaded into PT Assembler the focal length needs to be specified along with the appropriate multiplier (1.6 for the Canon 10D). The next step is defining the control points, which are reference points on each image at a seam that correspond to each other. This is where that 10-20% overlap is needed. Selecting the control points for each seam is where the most time is spent (manually), other than the software calculations (but you can go out and take pictures of the backyard flowers while the calculations are running). As you can see below the images in this panorama were not level (I was in a hurry and used the ball head without much time spent on leveling the tripod.).

PT Assembler Control Points selection dialog window
The next step is to select the reference point, which is that centered, eye level point you mentally noted while capturing the images. This tell the software how to adjust the yaw/roll/Pitch for all of the images in reference to this point. After setting the reference point the software auto-optimizes the settings, you start the panorama calculations and get a snack (It will take a few minutes depending on the number of images and there file sizes).
Clean-up in Photoshop:
After opening the file in Photoshop, the first step is to make a copy of each layer and delete the original of that layer (this allows the layers to be edited). You will be able to see the seams, to clean this up make selections at the seams (of the upper image) with the polygon selection tool and delete the seam. If there are any tonal differences at the seams you may need to make individual adjustments to the individual layers with curves or levels. Finally, zoom into 100% and look at the seams correcting any seam inconsistencies (such as clouds or water that changed between images) using a soft brush on the mask or the cloning tool.

Seam Selection

Selection Deleted
Max Lyons sight has a great Tutorial on the use of PT Assembler as well as examples of stitched images up to a (1+) Giga-pixel image.
Visit my homepage: www.thomaseven.com
